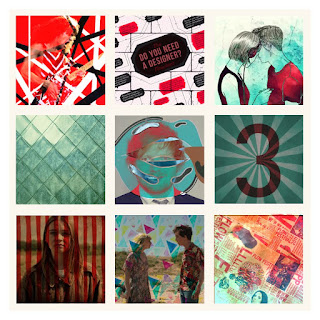
Blending modes make the colors in a layer react with the colors of any layers that are under it. You will be creating NINE mini designs, but you will need to connect the designs together by color so, when they are viewed as a whole, it can be seen as an entire piece.
- Watch the lesson about blending modes.
- Start by downloading the .psd document provided on Google Classroom
- You will be creating 9 successful combinations of images that use blending modes.
- When you open the document, you will see a grid of 9
squares. Each square will tell you what kinds of images to find for that
combination. For example, if it says HUMAN + TEXTURE, find a picture of any human and a picture of any texture. Place the
human on top of the texture and select a successful blending mode to use
on the top picture. Then trim off any excess picture that goes beyond
the grid square. A "successful" blending mode is one that produces an
enhancement in the way the two pictures look together. If your
combination creates no reaction, it is not a successful choice
(i.e. if your picture disappears or turns completely black.)
- Be sure to connect your nine designs by a common color(s).
- Use the rectangular marquee tool to trim off the part of your picture that doesn't fit in the square. All of your images should be trimmed down to a square size and should fill the given area.

- A TEXTURE image is anything that has a surface you can feel
- A NUMBER or LETTER - use your text tool. Type a number or letter.
- A COLOR - fill the area with a color with your paintbrush on a new layer
- An ILLUSTRATION - this can be any artwork created. It could be a drawing illustration, a computer illustration, a cartoon, etc.
- A PATTERN is anything that has a repeated design
- A HUMAN - I believe you understand this reference (or, do you? 👽)

